Pages

Saturday, November 30, 2013

Blessings and Wishes to All

Hello Crafty Friends,
 
Thank you for stopping by again! I appreciate you taking time from your busy holiday weekend and leaving some crafty love. I have been busy making projects and sharing since I can't do any more shopping...we spent too much money Thursday night and Friday on all the fabulous deals. I even started wrapping some of the presents this afternoon, so the kids wouldn't see what we got them.
 
 Now I am working on three different types of treat bags for my students and co-workers. Once my daughter sees them she may even want some for her friends and teachers. Those will be shared later!
 
Here are two cards I finished earlier today.
I used Joys of the Season Cricut cartridge for the angel, which was cut at 1 3/4" from p. 53.


I added gold glitter glue to the angel's wings and scattered gold sequins on the starry background.
 
Same Sketch, but Different Colors
I also used the same cartridge, Joys of the Season, for the rocking horse (p. 57), which was cut at 1 1/2". White sequins were randomly scattered in the background and adhered in bottom right corner.


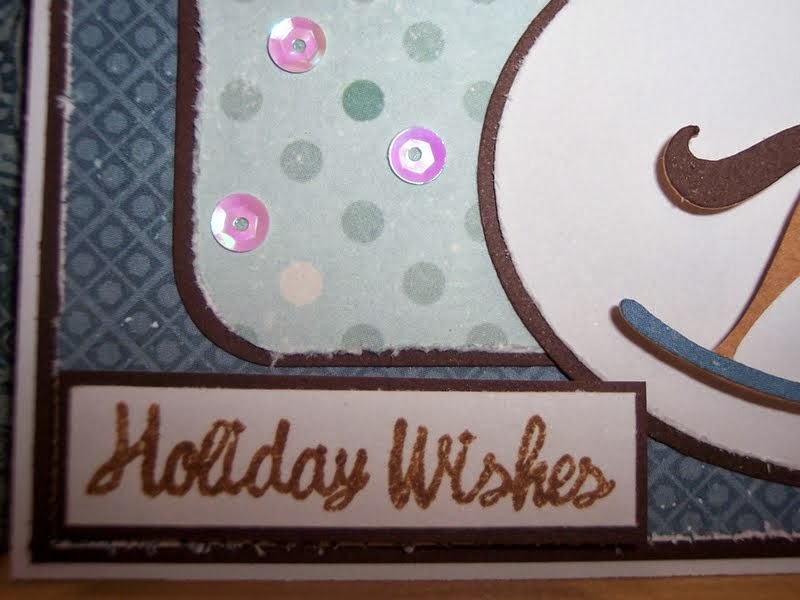
I love the bunched ribbon technique. I think it adds a slightly different look. If you want to see a pictorial, you can click here. Hope you will try!
 
I used this week's Tuesday Morning Sketches for both of these cards.
Other Materials:
pattern paper is from scrap box
dark brown, kraft, cream, and white card stock
crinkle ribbon
burgundy and blue button
gold embroidery floss
blue craft thread
gold glitter glue
My Craft Spot Stamps ~ Mistletoe set
brown and copper ink
 
Other Challenges:
 
Stay Creative,
Georgiana

Friday, November 29, 2013

O' Christmas Tree

Hello Crafty Friends,
 
Thanksgiving was a huge success and shopping was too! LOTS of great finds at wonderful prices. Late this afternoon was spent at the craft table. I was able to make this card after Carri, ABusyBee, said "Let's use a tree."
 
Here is my tree project...
Carri picked the tree on page 57 from Create a Critter. I was a bit concerned at first because it looked extremely plain in the booklet, but after finding the right paper and adding a few embellishments it definitely looks better. 
What do you think about the blue sequins as ornaments?
 Of course, what is a Christmas tree without presents?!?! They were cut at 1/2".
Inside sentiment
Other Materials:
Little Yellow Bicycle paper
cream, blue, and brown card stock
blue sequins
gold star
blue polka dot ribbon
green ink
 
Challenges:
 
Hope you enjoy the rest of your weekend. Me? I am going to work on an order for holidays cards. Loving this free time to create!
Georgiana

Wednesday, November 27, 2013

Thank You Pilgrims

Welcome back and thank you for visiting!

Sorry this is a day late. I had it ready to go yesterday along with the challenge post at Die Cuttin' Diva, but at the last minute I was doing some tweaking to the html codes and it cleared the post. Uuuggghhh! Therefore, I am rewriting now! Better late than never, huh?
 
There is a new challenge at Die Cuttin' Divas, so here is another opportunity for you to share your newest creation.
 
 The Challenge...Thank You
Now is the perfect time to tell someone how grateful you are.
 
 This is the last Thanksgiving card of the season, so I kept it simple just the way the Pilgrims lived their lives.
 I did add an action wobble for some fun.
Materials:
dark brown, gold, and kraft card stock
plaid pattern paper form scrap box 
Thanksgiving Cricut cartridge ~ pilgrim hat
Plantin Schoolbook ~ tag
brown ink
thank you stamp by inkadinkadoo
dark brown ribbon
gold embroidery floss
 green leaf button
gold glitter glue 
 brown liquid pearls
 
 Can't wait to see what you share at Die Cuttin' Diva this week! Now go check out the Design Team projects...be prepared to overwhelmed with gratefulness!
 
Stay Creative,
Georgiana

Sunday, November 24, 2013

Tis the Season

Hello Crafty Friends,
 
Once again the weekend flew right by, but at least it was productive. I completed a few projects and some are still in the works. This week we only have two days of class then a five day weekend for the Thanksgiving holiday. Yippee!
 
Here is one of the cards I made...
I used last week's Sweet Sunday sketch from The Sweetest Thing.
Joys of the Season Cricut cartridge for the 2 1/2" poinsettia
 This stamp belongs to the Whimsical Designs ~ Snow Much Fun stamp set.
Other Materials:
Heirloom Christmas paper by DCWV
gold glitter glue
Tim Holtz Peeled Paint distress ink 
Plantin Schoolbook Cricut cartridge ~ circle cut at 3" 
 
Challenges:
 
Look what else I started...
I still need to make the toppers, but I already have an idea of what I would like to cut.
I found a free download from Amanda's Parties to Go on Pinterest for the bottom of my kisses. Click here for link. I bought a 3/4" punch just for these, BUT I do not like how it cuts. What type of small punch do you recommend? I am going to invest in another one, but want it to work well.
 
Stay Creative,
Georgiana

Friday, November 22, 2013

Can You Guess the Birthday Request?

Yippee! It is Friday!
This week went by extremely slow. I had to ask my students almost every day what day it was since I had a difficult time keeping track. Well, it is the weekend now and closer to Thanksgiving. I am looking forward to the holiday and the upcoming shopping sales.
 
Last night I made a few personalized birthday cards for a fellow teacher. She made specific requests to be included. I wonder if you can figure them out. Here are two of them.
 
Here is my first card...
Can you guess what she requested?
 Did you guess for a biology teacher named AJ who was turning 27?
I used the Hello Kitty Cricut cartridge for the stack of books with apple (p. 62) cut at 2 1/2". The scalloped square was cut from Elegant Edges (P. 30) at 3" and the font is Plantin Schoolbook. The paper is Fancy Pants Design.
 
I loosely used the Tuesday Morning Sketches for both of these cards, but I am not linking because I am going to make another card true to the sketch.
 
 
The second card...
Try guessing again!
Did you guess the birthday boy, Andy, is a physical trainer?
 
 The sentiment was cut from the Birthday Bash Cricut cartridge and the paper is American Craft ~ Darling Dear. 
 
Hoping you have a fabulous weekend! I have plans to craft and get school work done. My intern's last day was today, so back to planning and teaching full-time all on my own. : )

Stay Creative,
Georgiana

Tuesday, November 19, 2013

Give Thanks at Die Cuttin' Divas

Welcome back and thank you for visiting!
 
Today brings a new challenge at Die Cuttin' Divas, so here is another opportunity for you to share your newest creation.
 
 The Challenge...Thanksgiving
Perfect for this week since Turkey Day is next week! We usually go to my in-laws, but this year we are going to celebrate at our house so my sister and her girls can join us. Her husband is away at a job and will not be home, so I want her to have family time too.
I used the following sketch from Mojo Monday.
I cut my turkey from the Thanksgiving Cricut cartridge at 2 1/4". Love his flourish tail! Every turkey needs a wiggly eye.
Brown sequins were added to the top and bottom corner. Sequins come is a variety of colors, shapes, and sizes so you have many options when deciding to use them. These came in a Martha Stewart kit, but you can find them everywhere...Hobby Lobby, Joanns, Michaels, Walmart , and on-line.
Materials:
Various sheets of card stock
dark brown and cream card stock
Thanksgiving Cricut cartridge ~ turkey cut at 2 1/4"
cream and brown ribbon
brown sequins
Spellbinders ~ Lacey Circles
brown ink
 
Other Challenges:
My Sheri Crafts ~ Thanksgiving/Fall

Can't wait to see what you share at Die Cuttin' Diva this week! Now go check out the Design Team projects...be prepared to see LOTS of Thanksgiving treats!
 
Stay Creative,
Georgiana

Sunday, November 17, 2013

Using the Incy Wincy Sketch for the Holidays

Hello Crafty Friends,
 
After grocery shopping this morning I made myself comfortable in my craft area and made two new cards using last week's sketch from Incy Wincy Designs. Unfortunately, I did not meet the deadline since the challenge site is from Australia and they are a day ahead. I will know for next time to keep an eye on the clock.
 
Have you ever done that...made a project and missed the deadline? I am disappointed, but still pleased with the outcome of both cards.
 
Here is the first holiday card...
 I added Citron glitter glue to the middle tree. All the trees sit on pop dots to add dimension.
 The brown cord "pops" on that green Bo Bunny button. The stamp is from Whimsical Designs ~ Snow Much Fun.
Here is the other card...
I thought of my daughter when I made this one since she mentioned how much she likes snowmen.
 I coated him with Glitz glitter glue so he would sparkle. Yes, it is still a little wet, but I am sure it will be dry by the time I am done typing this post.
 I added a wood button to match the arms and then tied a double bow with Blossom twine. This stamp is also from Whimsical Designs ~ Snow Much Fun.
Other Materials:
Recollections paper ~ Holly Day Wishes (top card)
brown and tan cardstock
Winter Woodland Cricut cartridge ~ trees (p. 37) cut at 2 1/2"
brown ink
 
My Mind's Eye paper ~ Merry (bottom card)
pink and black card stock
Hello Kitty ~ snowman (p. 77) cut at 2 1/2"
pink pearls
black ink 
 
Other Challenges:
 
Hoping you have a pleasant week. This is the last full week of school then we only have two days the following week. Looking forward to Thanksgiving Break and holiday shopping. I sure hope there are some good deals!  
 
Stay Creative,
Georgiana

Saturday, November 16, 2013

Thanks Pilgrim Bird

Hello Crafty Friends,
 
It is going to be a super Saturday. Just a few plans like grade papers, make some cards, and maybe do a little shopping. It is Saturday, so who could ask for more! I may even start making my holiday treat bags since I bought some M&Ms yesterday at CVS while they were on sale and I had a coupon to make the deal even better. Wohoo!
 
Last night I worked on a card for the neighbor. He is a high school Senior who brings my daughter to school in the morning. I plan on getting him a gift card for Thanksgiving. After last night though I may need to get him even more. Why? The Fed Ex man delivered my husband's package (a brand new ipad mini) to his house. Not sure why since we don't have the same house address or last name. We are just happy he is a good kid and returned the package! My husband said it probably helped that he is his HS principal too! : ) 
 
Here is the card I made...
 

 I used the following sketch from Seems a Little Sketchy.
 Materials:
various sheets of cardstock
3 Birds on Parade ~ Pilgrim bird (p. 41) cut at 2 1/4"
orange pearls
thank you stamp ~ Inkadinkadoo
brown ink
 
Challenges:
 
Hope you enjoy your weekend,
Georgiana

Thursday, November 14, 2013

Space Unit with Lots of Resources for Educators

Hello Friends,
 
Today's post is going to be focused on my current Science Unit since I know many educators are looking for good ideas that can be easily implemented. For the past two weeks our class has been studying Earth and Space. Next week we will focus on the moon. Many of these lessons were created when a fellow teacher friend, Teresa, and I wanted to address all our focus calendar skills. Our goal was to keep all students actively engaged yet address all learning modalities. I also wanted to create interactive notebooks that students would take care of and be proud of. The following are a list of ideas/links/resources that you can use in your class.
 
Week One 
At the beginning of the Space unit we brainstormed space words to activate background knowledge, which was followed with creating a Vocab foldable. The students had 6 required words which were written on the outside of each flap. Under each flap is the definition and an illustration. Then on day two, the students listened to a passage on stars and had to draw what they visualized. After listening to the 9 paragraph passage they had refer back to the passage and find a fact for each visual representation.
 
 
On day three we read Star/Sun Fact cards and played Find Someone Who...
The students followed with a Stars Temperature Diagram.
 
 On the fourth day we created a Planet Mnemonic. I found a free template on TpT, but decreased the size to fit 6 on a page. Each student received a copy for their notebook and then created their own.
 
 On the final day of week one we created our planet diagrams. They look FABULOUS!
 
I used a coloring page so the planets would "pop" on the black construction paper and then the students added a title, their mnemonic, the sun, and an asteroid belt.


Week Two
The second week began with a review of our mnemonic and diagrams. The we used our resources to create a 4 box grid in our notebook for the inner and outer planets.
 Students were required to find 5 facts (or more) for each planet. They read with a partner and documented their own notes. Then the students had to write 5 questions and quiz each other. I am going to use their questions to create a CPS (einstruction clickers) review before the test.
 
Day three was a venn diagram comparing/contrasting the inner and outer planets. The students were able to choose which style they wanted to use.
 
Day four consisted of Planet Riddles and a Space Comic Strip. We are still working on the comic, but they were instructed to create a 6 panel story with 3 - 5 space facts. I am looking forward to the students finishing tomorrow.
 
Week Three
Next week will be all about the Moon...more activities and resources to come! 
Activities may include...Armadillo Ray, a moon Phase book, Bill Nye, and Storybots Moon.


Getting Students Engaged...
Before each lesson, we watched a video/music clip. The following are some of the videos we enjoyed. Students are STILL singing the lyrics! 
 
Videos:
 
Other Resources:
 
Hope you find these resources helpful! I would love to hear from you.
Georgiana